How Can We Help?
-
Operations
- Using the Genius Checklist System (Web Based)
- Using the Genius Security Checklist System (Mobile App)
- Using the Genius Cleaner Checklist System (Mobile Website)
- Work Orders
- Work Orders - Corrigo Integration
- How to approve Work Orders that have been rejected - For State Managers
- Service Provider Staff – Quote Submission and Work Completion Evidence
- Planned Preventative Maintenance (PPM)
- Assign a CSM to a Site
- Assign a Site Manager to a Site
- Escalations
- Processing a Missed Clean Credit
- Processing a Missed Clean Makeup
- QA Records
- QA Report Client Recipient
- QA Report Settings
- Timesheet Lock
- Incident Register
- Incident Register on Mobile App (For employee)
- Checklist Reports
- Bulk Accepting Work Orders
- Missed Service Report
- Show all articles (7) Collapse Articles
-
CRM/BD
-
Roster/Timesheets
-
HR
- Adding Client Induction Documents
- Check Pending/Completed Conversions
- Conversion of Employment
- Create Leave Requests on behalf of Field Staff/Cleaners
- Leave Request Process
- Partial Leave
- HR Conversion of Employment
- HR FAQ
- HR Onboarding – How to upload a file
- HR Onboarding Admin Guide
- HR Onboarding Guide
- HR Schedule
- Onboarding – Updating Your Ezko Onboarding Record
- Onboarding – Updating Your SKG Onboarding Record
- Onboarding - Updating TFN
- Onboarding – Updating Bank Details
- Onboarding – Uploading Super Form
- Onboarding – Uploading Tax Form
- Onboarding Invitation Logs
- Onboarding Workflow
- Remove-Cancel Onboarding Invitation
- Schedule
- SP Onboarding
- SP Onboarding - Continue/Edit your onboarding record
- Terminating a Service Provider Staff
- Terminating an Employee
- Corporate Onboarding Guide
- Corporate Onboarding Admin Guide
- Show all articles (13) Collapse Articles
-
Other
- I am having trouble logging into the SKGenius
- Getting Started with Client Portal
- Mobile NFC Check In
- Audit Log
- Create Folder
- Forgot Your Password
- How to reset a password for Field Staff as a Corporate Staff
- Roles
- Uploading Documents to the SKG IMS
- User Assignment
- User Management
- Public Holiday Management
-
Time and Attendance
< All Topics
Print
QA Report Settings
Posted
Updated
Byaudigital
The QA Report parameters can be configured at the Client level.
The default QA Reporting scoring is from 1 to 3.
The scoring can be increased from 1 to 10 or an N/A option can be added if required.
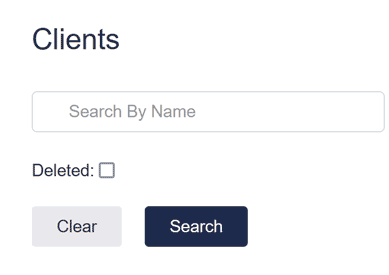
- Go to CRM->Clients
- Search for the Client and click on Search
- Click on the cogwheel

- Enable / Disable “Rating to 10” or “Add N/A option”
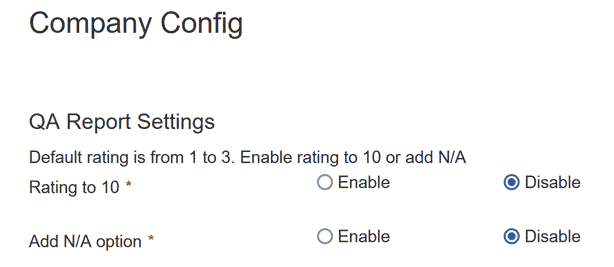
Table of Contents